Many hikers believe that slightly colder weather just requires an extra jacket. This is a dangerous misconception. The reality is that shoulder season introduces a new set of physical laws where your trusted summer habits and gear become liabilities. The key to safety isn’t just adding more layers, but understanding the physics of failure: how sweat leads to hypothermia, how cold kills batteries, and how seemingly safe snow can slide. This guide focuses on that critical shift in mindset.
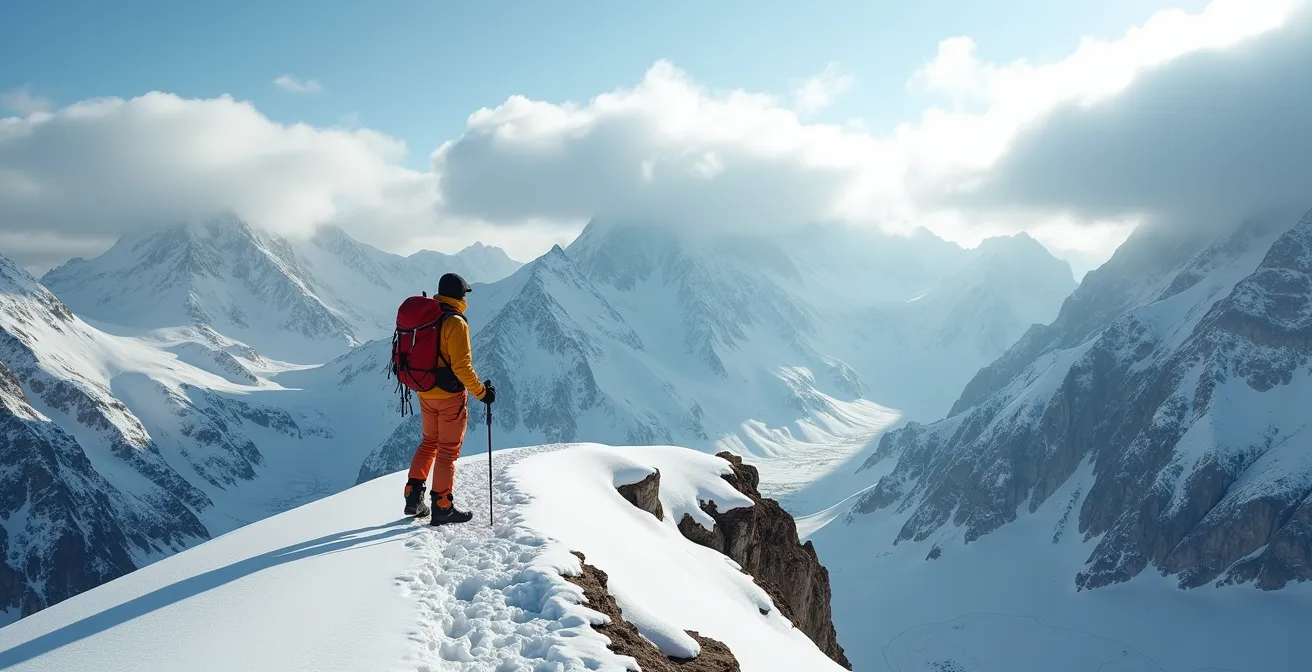
The appeal is undeniable. The crisp autumn air, the golden larches, the solitude of the mountains after the summer crowds have vanished. This is the shoulder season—that magical, volatile period between the stability of summer and the deep freeze of winter. For a hiker accustomed to predictable summer conditions, it feels like an easy extension of the season. This assumption is the first, and most critical, mistake.
From a mountain rescue perspective, the shoulder season is one of the most hazardous times of year. The most common advice you’ll hear—”pack layers,” “check the weather”—is not wrong, but it’s dangerously incomplete. It fails to address the fundamental shift in the environment. We don’t rescue hikers because they forgot a jacket; we rescue them because they failed to respect the unique physics of this transitional period. Their gear wasn’t inadequate, it was *inappropriate* for the hidden environmental traps.
But what if the key to safety wasn’t a longer gear list, but a deeper understanding of why things fail? What if, instead of just packing a headlamp, you understood the precise mechanics of how cold drains its battery? This guide is built on that principle. We will move beyond simple checklists to explore the mechanics of survival. We’ll analyze why microspikes are non-negotiable, how to manage the lethal threat of sweat, why your phone is not a reliable light source, and how to read the subtle but deadly signs of an unstable spring snowpack. This is about building a new mindset, one based on preparedness, redundancy, and a profound respect for the mountain’s most unpredictable mood.
To navigate these challenges safely, it’s essential to break down the core components of shoulder season preparedness. This article provides a structured approach, addressing each critical system—from your feet to your navigation tools—to ensure you return safely from every adventure.
Summary: A Guide to Shoulder Season Dangers and Equipment
- Why Microspikes Are Mandatory Even If There Is No Snow at the Trailhead?
- How to Manage Sweat When the Air Temp Is Freezing?
- Headlamps vs. Phone Light: The Battery Mistake That Strands Hikers
- The “Safe” Slope Angle That Can Still Slide in Spring
- GPS or Map: What to Trust When Fog Descends Suddenly?
- How to Choose Between French Terry and Fleece for Moisture Management?
- GPX Files: How to Load a Route onto Your Watch Before Losing Signal?
- Transitioning from Road to Trail: Mechanics for Preventing Ankle Sprains?
Why Microspikes Are Mandatory Even If There Is No Snow at the Trailhead?
The trailhead is clear, the sun is out, and the ground is bare. It’s easy to conclude that traction devices are dead weight. This is one of the most common and dangerous judgment errors in the shoulder season. The conditions at 2,000 feet have no bearing on what you’ll find at 4,000 feet, especially in shaded aspects or after an overnight freeze. What was meltwater in the afternoon becomes a treacherous, invisible layer of verglas, or black ice, by morning. A simple slip on this terrain can result in a sprain, a fracture, or a life-threatening fall.
Microspikes are not for deep snow; they are for ice and hard-packed, slippery surfaces. Unlike full crampons, they are designed for mixed conditions, allowing you to walk comfortably on bare rock or dirt and then securely cross an icy patch without stopping to change gear. They are your insurance policy against the unseen. Relying on lugged summer boots alone provides a false sense of security, as the rubber compounds harden in the cold and lose their grip, offering little purchase on ice.
Case Study: The Superiority of Balanced Traction
The importance of appropriate spike design cannot be overstated. Testing by Treeline Review in 2025 found that traction devices like the Black Diamond Distance, featuring 14 distinct 8mm stainless steel spikes, delivered the best all-around performance in alpine environments. The study highlighted that shorter 8mm spikes provide an optimal equilibrium between a firm grip on hard ice and the ability to walk over exposed rock without the instability or damage associated with longer spikes. This balance makes them perfectly suited for the unpredictable nature of shoulder season trails, where a hiker might encounter everything from dry dirt to sheer ice on a single ascent.
Think of microspikes as a mandatory part of your footwear system from October through May. They should live in your pack, no matter what the trailhead looks like. The decision to carry them is made at home, not on the trail, because by the time you realize you need them, it’s already too late.
How to Manage Sweat When the Air Temp Is Freezing?
In summer, sweat is a comfort issue. In the cold of the shoulder season, it is a life-threatening problem. This is the central principle of moisture management. When you stop moving after a strenuous ascent, the sweat trapped in your layers will use your body heat to evaporate, rapidly pulling warmth from your core. This process, known as evaporative and conductive heat loss, is a primary driver of hypothermia. The mountain rescue community has a saying: “Cotton kills.” This is because cotton is hydrophilic; it absorbs and holds moisture, acting like a death shroud in cold, wet conditions.
The solution is a disciplined layering system built from hydrophobic (water-hating) or hygroscopic (moisture-moving) materials like polyester fleece and merino wool. But the gear is only half the battle. The other half is technique. As expert Clayton Herrmann advises, the goal is to “start cold.” This feels counter-intuitive, but it’s crucial. Begin your hike feeling slightly chilled, knowing that your body will generate significant heat within the first 15 minutes of uphill movement. This prevents the initial, massive sweat-out that soaks your base layer and sets you up for failure later.
Starting cold because you don’t want to sweat is the biggest thing to prioritize.
– Clayton Herrmann, Field Mag
Managing your layers is a dynamic, constant process. Be prepared to stop and de-layer before you get hot, and add a layer back on the moment you stop for a break. It’s a discipline that requires you to be ruthlessly honest about your output and the ambient conditions.
The fabric you choose is the foundation of this system. Not all synthetics or wools are created equal. Their performance in managing moisture varies dramatically, which can be the difference between a comfortable day and a hypothermic emergency.
| Fabric Type | Moisture Behavior | Dry Time | Best Use Case |
|---|---|---|---|
| Polyester Grid Fleece | Hydrophobic – pushes moisture away | Extremely fast | High-output activities in cold |
| Merino Wool | Hygroscopic – absorbs 30% weight in moisture while feeling dry | Moderate | Variable intensity activities |
| French Terry Cotton Blend | Absorbs and holds moisture | Very slow | Low-output activities or camp wear only |
Headlamps vs. Phone Light: The Battery Mistake That Strands Hikers
Relying on a smartphone as your primary light source is a rookie mistake with potentially fatal consequences. While convenient, a phone has three critical flaws in an alpine environment: it’s not hands-free, its beam is unfocused and weak, and most importantly, its battery is extremely vulnerable to cold. Cold temperature is the enemy of battery chemistry. Research shows that lithium batteries can lose up to 50% of their capacity at freezing temperatures. This “energy budget” collapse is accelerated when using the phone for navigation and photos, leaving you with no power when darkness falls unexpectedly.
Shoulder season is defined by rapidly diminishing daylight. Hikers often misjudge the timing, starting too late or moving too slowly, and find themselves caught out. With 10-16 hours of darkness during shoulder season months, getting caught out is not a minor inconvenience; it’s a long, cold, and dangerous ordeal. A dedicated headlamp is a non-negotiable piece of equipment. It keeps your hands free for using trekking poles or scrambling, and its focused beam is essential for efficient route-finding in the dark. Modern headlamps offer robust performance, but they are not immune to the cold.
This is where system redundancy becomes critical. Your primary headlamp should be equipped with fresh lithium batteries, which perform better in cold than alkaline. Your backup system consists of spare batteries stored in a warm inner pocket, close to your body. For ultimate security, a tiny backup headlamp or even a simple, non-battery-dependent chemical light stick can be a lifesaver.
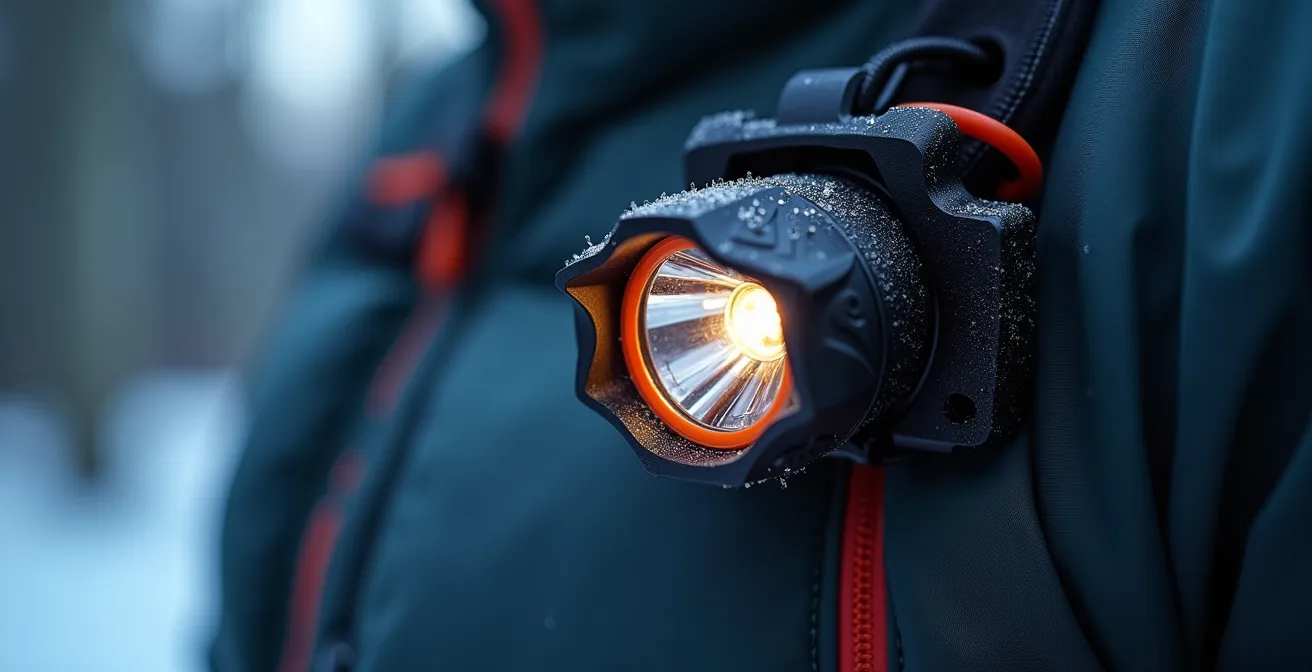
The image above illustrates an advanced setup: a headlamp with an external battery pack. This allows the power source to be tucked inside a jacket, using body heat to preserve its life, while only the lamp itself is exposed to the elements. This is the level of preparation required when facing unpredictable conditions.
Your Cold-Weather Battery Preservation Protocol
- Keep phone and spare batteries in an internal jacket pocket, leveraging your body heat for warmth.
- Utilize a headlamp with an external battery pack that can be stored inside clothing to maintain its temperature.
- Always carry lithium batteries instead of alkaline, as their chemical composition is more resilient to cold.
- Switch all electronic devices to airplane mode when not actively using their network features to minimize passive battery drain.
- Pack a non-electronic backup: chemical light sticks are foolproof and do not rely on batteries or temperature.
The “Safe” Slope Angle That Can Still Slide in Spring
Summer hikers often associate avalanche danger with the massive powder slides of mid-winter. In spring, the danger is more subtle and widely misunderstood. The primary threat shifts to wet slab and loose wet avalanches, which are triggered by solar radiation and melting, not by a person’s weight. As the sun warms a slope, meltwater percolates through the snowpack, lubricating weak layers and breaking the bonds holding the snow to the mountainside. This can happen even on days with freezing air temperatures.
A common misconception is that avalanche danger is confined to steep slopes above 30-35 degrees. While this is a general rule for dry winter slabs, it does not hold true for wet slides. Avalanche experts warn that even slopes below 30 degrees can still be deadly when they funnel into terrain traps. A terrain trap is any feature that can worsen the consequences of an avalanche, such as a gully, a creek bed, or the area above a cliff. A relatively small slide on a “safe” low-angle slope can become catastrophic if it sweeps you into a gully where the debris piles up deeply.
Reading the signs of unstable spring snow is a critical skill. Be vigilant for “rollerballs” or “pinwheels”—small balls of wet snow rolling down slopes, which are clear indicators of warming and instability. Listen for “whumpfing” sounds, which signify the collapse of a weak layer under your feet. The most dangerous time is often in the afternoon, after the sun has had hours to work on the snowpack. An early start and an early finish—”alpine starts”—are a key defense mechanism to avoid being on sun-exposed slopes during their period of peak instability.
GPS or Map: What to Trust When Fog Descends Suddenly?
In clear weather, a GPS device or a smartphone app feels infallible. But in the shoulder season, conditions can change in minutes. A warm front moving in can generate thick, disorienting fog, reducing visibility to less than 20 feet. It’s in this moment that total reliance on a single electronic device reveals itself as a critical vulnerability. As discussed, cold kills batteries. A GPS unit that worked perfectly at the trailhead can die without warning, leaving you blind.
This is not a theoretical risk. It is a recurring scenario in mountain rescues. The Appalachian Mountain Club, for instance, frequently conducts rescues in New Hampshire’s White Mountains where hikers’ sole reliance on GPS led them into peril. Their devices either failed due to cold-induced battery death or lost signal in deep, narrow valleys. The hikers who successfully self-rescued were consistently those who practiced system redundancy. They used their GPS to get a quick fix, but then cross-validated that position on a physical, waterproof map and used a compass for navigation.
The essential, non-electronic navigation kit is a map of the area and a compass. More than just having them, you must know how to use them. This includes basic skills like orienting the map and taking a bearing. In zero visibility, an even more advanced skill, dead reckoning, becomes vital. This involves using your last known position on the map, following a compass bearing, and counting your paces to estimate the distance traveled. It is a meticulous, demanding process, but it is a proven method for navigating when your eyes and your electronics fail you.
Your navigation system must be robust enough to withstand the worst-case scenario. This means a waterproof map, a reliable compass, and the knowledge to use them. The GPS is a powerful tool, but it is only one part of the system—it is a convenience, not a lifeline.
How to Choose Between French Terry and Fleece for Moisture Management?
Delving deeper into moisture management, the choice between different types of mid-layers can seem confusing. Terms like “French Terry” and “Grid Fleece” are common, but they represent fundamentally different technologies with vastly different applications. Choosing the wrong one based on casual comfort can directly compromise your safety. French Terry, often a cotton-polyester blend, is known for its soft, looped interior. While comfortable for casual wear, its cotton content makes it a liability for high-output activity. It absorbs and holds sweat, becoming heavy, cold, and slow to dry—a perfect recipe for hypothermia.
Fleece, on the other hand, is a purely synthetic material (typically polyester) designed for performance. Its fibers are hydrophobic, meaning they inherently repel water. Instead of absorbing sweat, fleece allows moisture vapor to pass through it, away from your body. Grid fleece represents the pinnacle of this technology. It features a pattern of raised fleece squares with thin channels of fabric in between. The fleece squares provide warmth, while the channels act as express lanes for moisture to escape, dramatically increasing breathability.

The macro view above reveals the architectural genius of grid fleece. The channels are visibly thinner, creating a pathway for heat and moisture to vent, while the thicker fleece pods trap air for insulation. This design makes it the superior choice for strenuous ascents in cold weather, where you are generating maximum heat and sweat.
The right choice depends on a frank assessment of your own physiology and your planned activity level. As backpacking expert Paul Mags states in his Shoulder Season Backpacking Guide, “For a ‘high sweater’ on a steep ascent, fleece is non-negotiable. For a ‘low sweater’ on a flat approach, the comfort of French Terry might be acceptable.” This highlights the need for personal calibration.
| Activity Level | Sweat Rate | Recommended Fabric | Key Advantage |
|---|---|---|---|
| High Output Climbing | Heavy | Grid Fleece (Polartec Power Grid) | Superior breathability via channel design |
| Moderate Hiking | Average | Standard Polyester Fleece | Fast drying, reliable warmth-to-weight |
| Low Output/Camp | Light | French Terry Blend | Maximum comfort, acceptable for static use |
GPX Files: How to Load a Route onto Your Watch Before Losing Signal?
A modern GPS watch is a powerful navigation tool, but it’s only as good as the data it holds and the battery that powers it. Simply owning the watch is not enough; you must have a disciplined workflow for loading and verifying your route *before* you leave civilization and cell service. A GPX (GPS Exchange Format) file is a digital map of a route that you can download from various platforms and load onto your device. This allows you to follow a pre-planned track without relying on a live data connection.
The process must be deliberate and include several layers of verification. It is not enough to simply sync a file and hope for the best. A corrupted file, an incorrect route, or a failed sync can leave you stranded. The professional workflow involves sourcing, vetting, syncing, and verifying the route at home, where you have a stable internet connection and power.
Here is a step-by-step process for safely loading a GPX route:
- Source: Download the GPX file from a trusted platform. Popular choices include Strava, Gaia GPS, AllTrails, or websites from local mountaineering clubs that have recently vetted the trails.
- Vet: Before syncing, load the file into a desktop mapping program (like CalTopo or Gaia GPS’s web interface). Scrutinize the route. Does it follow established trails? Are there any alarming sections, like crossing a notoriously dangerous river or an avalanche-prone slope? This is your chance to catch errors.
- Sync: Use your watch’s companion app on your phone (e.g., Garmin Connect, Suunto App) to transfer the vetted route file to your watch. Ensure both devices are fully charged and connected to WiFi.
- Verify: After the sync completes, do not assume it worked. Open the route on the watch itself. Can you see the map line? Can you zoom in? This final check confirms the file is loaded and uncorrupted.
- Backup: Technology fails. As a final layer of redundancy, take screenshots of key junctions or difficult sections of the map on your phone, and always carry a physical map as the ultimate non-digital backup.
Key Takeaways
- Shoulder season danger comes from environmental traps (ice, wet snow, cold) and the failure of summer gear/habits, not just colder temperatures.
- Moisture management is a survival skill. Sweat is a primary mechanism for hypothermia; prioritize hydrophobic layers and avoid overheating by starting cold.
- System redundancy is mandatory for critical gear. Always have a backup for navigation (map/compass), light (spare batteries/headlamp), and traction.
Transitioning from Road to Trail: Mechanics for Preventing Ankle Sprains?
The transition from a summer of hiking on dry, predictable dirt to the unstable terrain of the shoulder season introduces a heightened risk of lower-leg injuries, particularly ankle sprains. The ground is a treacherous mix of mud, wet roots, loose rocks, and hidden patches of ice. Each step is uncertain. Your body’s ability to react to this instability depends on a neurological skill called proprioception—your brain’s awareness of your body’s position in space. This sense allows your ankle to make micro-adjustments to prevent a roll, but it can be weak if not specifically trained.
Strengthening the muscles around the ankle is important, but training the neuromuscular connection is even more critical. This can be done with simple exercises at home that challenge your balance and force your ankle stabilizers to fire. Integrating these drills into your routine in the weeks leading up to a shoulder season hike can dramatically reduce your risk of injury.
Here are several effective proprioception exercises:
- Single-Leg Balance: Stand on one foot for 30-60 seconds. To increase the difficulty, close your eyes, which forces your body to rely entirely on feedback from your ankle.
- Alphabet Tracing: Lift one foot off the ground and slowly trace the letters of the alphabet in the air with your big toe. This moves the ankle through its full range of motion.
- Heel-to-Toe Walking: Walk in a perfectly straight line, placing the heel of your advancing foot directly against the toes of your back foot with each step, like walking on a tightrope.
- Balance Board/Cushion: Using an unstable surface like a wobble board or foam cushion while performing daily tasks (like brushing your teeth) provides constant, low-level training for your ankle stabilizers.
Beyond physical conditioning, gear plays a significant role. Sturdy, waterproof boots with good ankle support are essential. Furthermore, the use of trekking poles is highly recommended. Studies demonstrate that trekking poles create two additional contact points, reducing joint stress by 25% and providing crucial stability when you slip unexpectedly. They act as outriggers, allowing you to catch your balance before an ankle roll becomes a full-blown sprain.
The foundation of a safe shoulder season adventure is not the gear in your pack, but the knowledge in your head. It is the discipline to prepare meticulously, the humility to turn back when conditions deteriorate, and the unwavering respect for the mountain’s power. Apply this mindset to every outing, and you will be prepared not just to survive, but to thrive in the wild beauty of the shoulder season.
Frequently Asked Questions About Shoulder Season Hiking
What visual signs indicate unstable spring snow conditions?
Look for rollerballs or pinwheels rolling down slopes, listen for “whumpfing” sounds underfoot, and note any rapid warming trends or afternoon sun on slopes – these are clear indicators of potential wet slab avalanche conditions.
Why are wet slab avalanches different from winter avalanches?
Wet slabs are triggered by solar radiation and meltwater lubricating weak layers, making them most likely in afternoon hours when sun exposure is highest, unlike dry winter avalanches that can occur anytime.
How do terrain traps increase danger on low-angle slopes?
Even small slides on gentle slopes become catastrophic when they funnel into gullies, creek beds, or over cliffs where debris accumulates, potentially burying victims deeply even from minor avalanches.
What’s the difference between GPX ‘track’ and ‘route’ formats?
A track is a simple breadcrumb trail requiring map-reading skills but uses less battery. A route includes turn-by-turn alerts making navigation easier but drains watch battery much faster – critical in cold weather.
What to do when GPX sync fails?
Restart both devices, re-download the file from a different source, try converting between GPX formats using online tools, or as last resort manually create waypoints on the watch.
How much battery does GPS navigation use in cold conditions?
Expect 40-60% faster battery drain in freezing temperatures. A route with alerts may last only 8-10 hours versus 15-20 hours for simple track following.